The major change in 64bit, apart from the new user interface and raster menu, is the Layouts have changed. since 2012 in 32bit, there has been a "Layout Designer" window. This is now the "Layout" window and old layouts are not there. any workspace containing an old layout, is automatically converted to a layout designer new layout window.
Once you have installed the 64bit version, it is not recommended or supported to use or install the previous 32bit versions, as there are conflict when opening Excel or Access files, and some tables and workspaces created 64bit will not be openable in 32bit.

1. I can't find my favourite/essential tools!!
Try typing the name or appropriate keyword into the Tool Search at the top right of the MapInfo Discover interface, note many tools have different names so search for keywords about their functions:
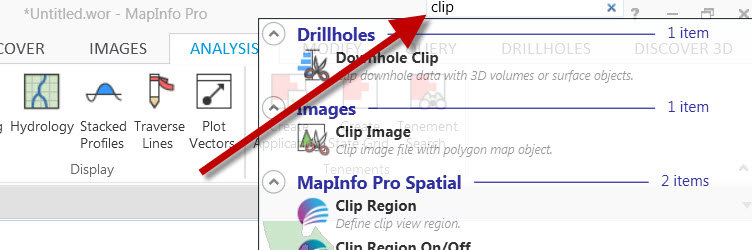
"I still cannot find that tool!". Certain tools and functionality have been either replaced or retired from MapInfo Discover 64-bit. See this article for a complete listing.
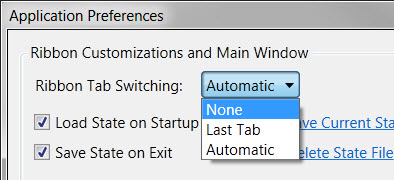
2. Disable MapInfo Pro's automatic Ribbon Tab Switching
When opening a drillhole project, do you get frustrated when MapInfo Pro then automatically changes to the MAP tab?
Disable this behaviour by navigating to the PRO>Options>Application option, and setting the 'Ribbon Tab Switching' setting to <None>.
3. I want commonly used commands, like Select, Zoom, Pan, etc, always in the same place.
There is a new floating toolbar, which contains frequently used functions if you right click in a map -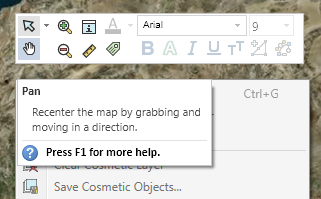
Once you have installed the 64bit version, it is not recommended or supported to use or install the previous 32bit versions, as there are conflict when opening Excel or Access files, and some tables and workspaces created 64bit will not be openable in 32bit.
1. I can't find my favourite/essential tools!!
Try typing the name or appropriate keyword into the Tool Search at the top right of the MapInfo Discover interface, note many tools have different names so search for keywords about their functions:
"I still cannot find that tool!". Certain tools and functionality have been either replaced or retired from MapInfo Discover 64-bit. See this article for a complete listing.
2. Disable MapInfo Pro's automatic Ribbon Tab Switching
When opening a drillhole project, do you get frustrated when MapInfo Pro then automatically changes to the MAP tab?
Disable this behaviour by navigating to the PRO>Options>Application option, and setting the 'Ribbon Tab Switching' setting to <None>.
3. I want commonly used commands, like Select, Zoom, Pan, etc, always in the same place.
There is a new floating toolbar, which contains frequently used functions if you right click in a map -
You can also configure the Quick Access Toolbar (top left of the screen) with your favourite & essential commands, so they are always accessible from the same location, regardless of which tab you have open, or whether the current window is a browser, mapper or layout.
An example of a customized Quick Access Toolbar is shown below, with commonly used tools such as Open, Save and Close All Tables, in addition to Zoom, Pan and Select/Clear Selection:
To customize, simply find the menu item you wish to add and right click on it, there will be an option to Add to Quick Access Toolbar
Note that Discover and 3rd party add-ins menus are not supported to add to the QAT.
4. Using multiple screens / monitors.
1) Open a Browser or Map tabbed window.
2) Right click on its tab, and select 'Floating'.
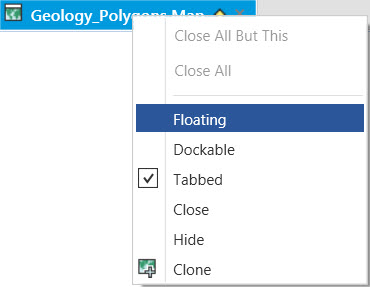
3) Drag the now floating window onto your secondary screen.
4) If desired, maximize this floating window.
5. What is happening with my layouts? Changing the Map windows doesn't change the layout!
The Layout Designer now clones and duplicates the original map window when it is added to a layout, i.e. Map Windows are now embedded and contained within a Layout. Hence, you will now have 2 maps in the Explorer window, suffixed :1 and :2 etc.
11. Where do I find all the content normally under Help?
The MapInfo Pro ribbon interface uses a 'backstage' area under the PRO tab.
For Discover specific Help content, product updates, etc, navigate to PRO>Add Ins>Datamine Discover
To configure Discover, e.g. file paths, display options, notifications, etc, navigate to PRO>Options>Datamine Discover>Configuration.
12. Try different Ribbon interfaces.
Everyone works differently, for example some users are data type focused, whilst others are action/workflow-orientated. MapInfo Discover ships with a number of different ribbon layouts to help cater for these.
Navigate to the PRO>Options>Datamine Discover>Configuration option, and on the 'Ribbons' tab, select a different Ribbon. Note that this will require a MapInfo restart for the change to take affect.
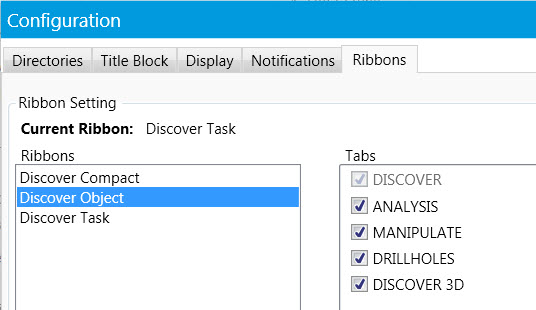
This change will be remembered for future MapInfo Discover Bundle sessions.
10. Where do I find the Surfaces module functionality?
The SURFACES menu has been added back in Discover 2017, but is strongly recommended to use the new RASTER tab.
An example of a customized Quick Access Toolbar is shown below, with commonly used tools such as Open, Save and Close All Tables, in addition to Zoom, Pan and Select/Clear Selection:
To customize, simply find the menu item you wish to add and right click on it, there will be an option to Add to Quick Access Toolbar
Note that Discover and 3rd party add-ins menus are not supported to add to the QAT.
4. Using multiple screens / monitors.
1) Open a Browser or Map tabbed window.
2) Right click on its tab, and select 'Floating'.
3) Drag the now floating window onto your secondary screen.
4) If desired, maximize this floating window.
5. What is happening with my layouts? Changing the Map windows doesn't change the layout!
The Layout Designer now clones and duplicates the original map window when it is added to a layout, i.e. Map Windows are now embedded and contained within a Layout. Hence, you will now have 2 maps in the Explorer window, suffixed :1 and :2 etc.
To modify the map in a layout -
1. Double left click within the map frame area OR right click and select Activate
2. Noticed it is highlight with a Blue frame
3. Then zoom/pan and make changes in the layer control, all options in the MAP menu are now enabled
4. To de-activate and go back to LAYOUT frame mode, left click anywhere in the Layout window outside of the activated frame.
Once activated, you can add scalebars, grids, and all other tools you can add to a normal map window.
A demonstration of this is here -
For more tips on the layout, see -
6. I can't add my legend to the layout!
This is a regression. You can no longer add Legend Designer windows to a Layout.
Use the Layout>Legend option to create a new legend. Or, if you already have a customised a legend for the map, create a New Layout using the LAYOUT menu, and select Map>Map Name. this will automatically add the associated legend for the map to the layout.
Note this will split the legend, into separate frames for each layer/table in the legend.
If you wish to have a white solid background in the legend frame, simply right click and select Frame Properties. In here set the fill to solid black, with a foreground colour of white. You can also set a border line style.
7. What happened to my Layout Object Fill Patterns and Line Styles?
This functionality was re-added in MapInfo 2019 or later. In MapInfo 64bit versions prior to 2019 this functionality was lost.
8. How do I spread a Layout Frame to print over multiple pieces of paper?
This is a regression. It is no longer possible to spread a large frame to print over multiple pieces of paper. A workaround is to print to a larger PDF paper size, and the use the PDF Viewer to tile and print that to smaller page sizes.
9. How do I save a Layout window to a EMF or WMF vector image?
This is a regression. It is no longer possible to save to a EMF or WMF from the layout window, only a map window can.
10. How do I print a Layout window with crisp resolution?
This is a regression. It is no longer possible to print a Layout Window to a PDF or Printer using a vector EMF format. Printing from a Layout window is always rasterized (Offscreen bitmap), therefore, vector patterns and styles may be blurred.
The MapInfo Pro ribbon interface uses a 'backstage' area under the PRO tab.
For Discover specific Help content, product updates, etc, navigate to PRO>Add Ins>Datamine Discover
To configure Discover, e.g. file paths, display options, notifications, etc, navigate to PRO>Options>Datamine Discover>Configuration.
12. Try different Ribbon interfaces.
Everyone works differently, for example some users are data type focused, whilst others are action/workflow-orientated. MapInfo Discover ships with a number of different ribbon layouts to help cater for these.
Navigate to the PRO>Options>Datamine Discover>Configuration option, and on the 'Ribbons' tab, select a different Ribbon. Note that this will require a MapInfo restart for the change to take affect.
This change will be remembered for future MapInfo Discover Bundle sessions.
10. Where do I find the Surfaces module functionality?
The SURFACES menu has been added back in Discover 2017, but is strongly recommended to use the new RASTER tab.
Have a look at the capabilities in new RASTER tab, which has improved rendering and colouring abilities. Converting raster grids into the MRR format will provide the fastest processing in MapInfo. The majority of the Surfaces module capabilities are present in the RASTER tab. This article discusses some of the current limitations migrating from Surfaces -> MapInfo Pro Raster, as well as workarounds.
A list of Surfaces capabilities not currently in MapInfo Pro Raster can be found here.
The Hydrology module can be found on the ANALYSIS tab.

10. The legacy Enhanced Layer Control is missing. How can I iterate previous views?
A list of Surfaces capabilities not currently in MapInfo Pro Raster can be found here.
The Hydrology module can be found on the ANALYSIS tab.
10. The legacy Enhanced Layer Control is missing. How can I iterate previous views?
This function was re-implemented as a new feature in Discover 2017 Update under DISCOVER>Windows>Previous View and Next view.
11. More tips for using the MapInfo Pro Ribbon interface
Can be found on the Precisely MapInfo Community forum here
Can be found on the Precisely MapInfo Community forum here


